PhotobucketPhotobucketPhotobucketPhotobucket

Showing posts with label project. Show all posts

Monday, May 17, 2010

Special Guest Blogger

I received a very special gift for Mother's Day this year.  
Beau made me this beautiful bouquet of flowers: 


He is his mom's son.

I thought this would make a cute place card holder for a family dinner, so I asked Beau to show us how to do it.

First, take two strips of green paper and staple them together.


On one of the long sides, cut slits of varying length.

Roll up the paper.


Staple the roll together.


Fluff the stems.


Now cut out your flowers.  
According to Beau you will need 8 flowers and 8 centers each of two different colors.


Glue the centers to the opposite color flowers.


Glue the flowers on to the stems.  Some stems will not have a flower.


 Finally, clip a name card onto the bouquet, and set it on your place setting.


What Nanny wouldn't love that???

For the record {and to hopefully make some of you feel better about your day}if you could see the rest of the dining room table and living room area... you would be appalled.  
I only cleaned enough of the table to take this photo. 

Friday, May 14, 2010

Obession: Books - Part II, Books Cost too Much

Looking for my calendar giveaway on Bird Crafts?  It's here.
......................................................................

 Okay... so much to do here today.  First of all... it's time for a giveaway winner!  
Random.org chose {drumroll, please}:


Congratulations Christina from Ruby Red Studio!  Please contact Megan to claim your prize.

If you didn't win... Megan still has a great offer for you.  
Order from Preppy Prints before Sunday {5/16/10} at midnight PST and mention my blog in the Message to Seller at checkout and Megan will refund $3.50 on your order... making the cost just $10 for your own Customized Digital Invitation!  Thanks Megan!

I will have a new giveaway starting next Tuesday, so be sure to check back.  

From now on my giveaways will be starting each Tuesday and running through Sunday, with winners announced each Monday.

Whew... now on to my regularly scheduled programming.
......................................................................

"Books cost too much! That's why I opened Crown Books"

Anyone else remember that commercial from the 80's, or is it just me?  Just me?  Oh.

Well Brooke and I love to swap books and then pass them on to other friends, because that guy was right... books do cost too much. 

It got me to thinking that it would be fun to have a kind of book chain, where we passed the same book around to lots of friends, and had each person write a little review inside to pass along to the next person.

First of all, it had to be a good book worth passing along... right?


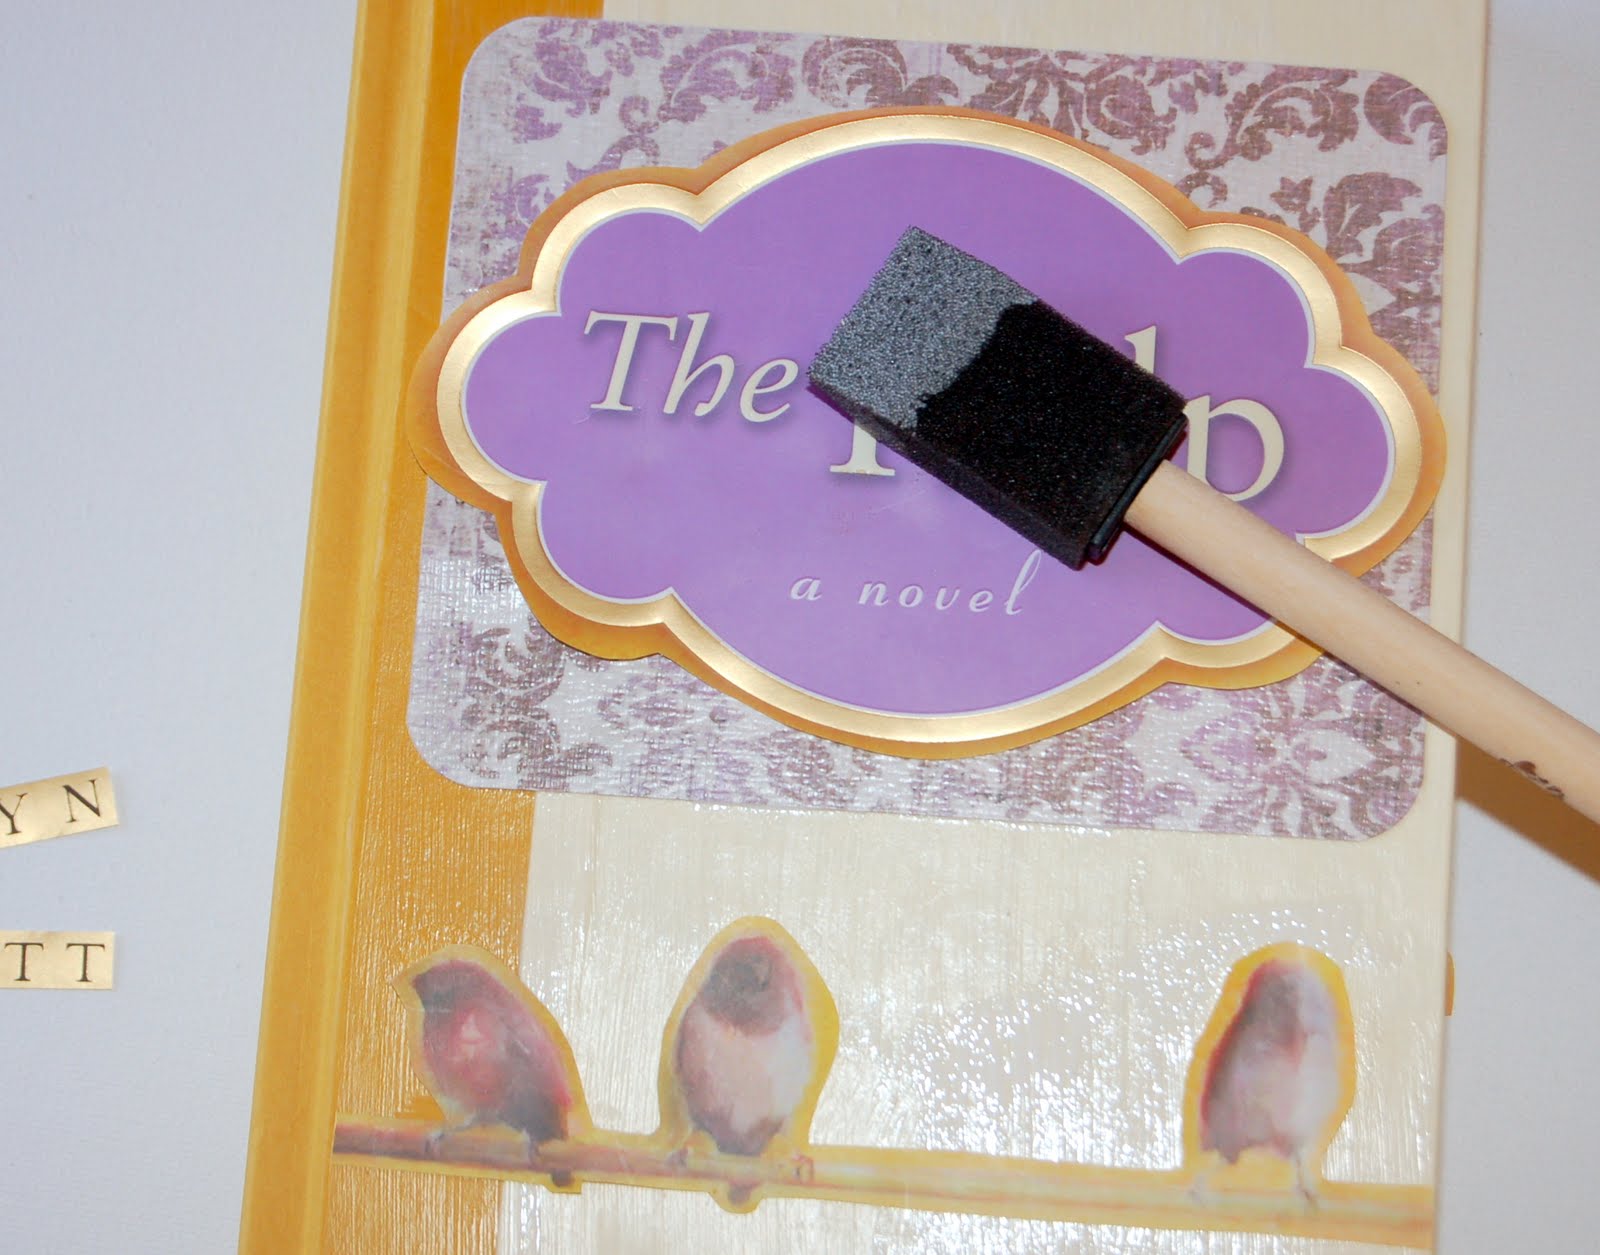
I took off the original cover, and cut out some key elements that the new book cover would need.


Then I decoupaged some fun paper onto the cover, along with those key elements.


Finally, I wrote my review on the inside cover.


You may want to spray the finished product with an acrylic clear finishing spray to keep it from being too tacky {and by tacky I mean sticky, not ugly... you'll have to keep yourself from making it ugly.} 

Does it make you want to read this book more?
You should want to read it anyway... it is excellent.


I think this would make a great gift for a book lover.  
And the best part is that because you are taking off the store cover... it will no longer have the price right on the gift!

Tuesday, May 11, 2010

Button Topiaries

Looking for my calendar giveaway on Bird Crafts?  It's here.
......................................................................
Looking for the Preppy Prints Digital Invitation Giveaway?  Scroll down or click here.
......................................................................
 I got my first blog award today!  I'm somebody.  
Thanks so much to Brittany from Love Stiched for honoring me with the Sunshine Award.


The requirements of this award are:
1. Put the logo on the blog within your post.
2. Pass the award on to 7 bloggers.
3. Link the nominees within your post.
4. Let them know they received this award by commenting on their blog.
5. Share the love and the link to the person from whom you received this award. 

I nominate:
Christina @ Ruby Red Studio
Molly @ Pastor's Wife Redefined (better getting blogging again Molly!)
Beckey @ Hippo Brigade
......................................................................

Okay, I promised a craft today... and here it is.  
Please excuse the pictures.  
My good camera was over at my sister's house and I didn't feel like going all the way over there to get it {yes, and by 'all the way over there' I mean the twenty-five yards across the street was too far}.  


Whatd'ya think?  
It's a cute little topiary.  
I thought it would make a great little Get Well gift or even a cute shower centerpiece.  
You can use any color buttons and ribbon to go with whatever color scheme.

To start, I purchased the small clay pot, a wooden dowel {which I broke with my hands... I know, I'm Shera} and Styrofoam circles at Michael's.


I put one of the foam circles in the pot to hold the stick, then stuck a slightly larger circle on the top for the topiary.  In hindsight, I think I would wait to put the top circle on until you have covered it with buttons, just be sure to leave a little area at the bottom to stick the dowel into.
Also in hindsight I would have painted the dowel first... aren't you glad you get the benefit of learning from my mistakes?


I used gold paint, but with the quality of this picture I know it is hard to tell.  Alternatively, you could buy a green dowel, like the kind they use as plant stakes, then you could just leave it green.

Then I just started pinning buttons on.  I started with the largest ones that I had so that I could cover the majority of the open space.


I filled in the empty spaces with smaller buttons until the whole thing was covered.  
{Although... truth be told, I ran out of buttons before I finished so I took all the buttons from the backside and moved them to the front for the purpose of this posting.  Next time I go back to Michael's I will finish this project.  
In other words... buy two packages of buttons.}

Lastly, I took a little green felt that I had lying around, cut a strip, wrapped it around the bottom foam and pinned it on with some buttons.


Easy, peasey, lemon sqeezey... as my son would say!

I'm off to be the Librarian now.  A mom's day is never done.

Wednesday, May 5, 2010

Party Banners

Looking for my calendar giveaway on Bird Crafts?  It's here.
......................................................................

Have you got a Cricut®? Or maybe the new eCraft™ machine? I’ve been using the Cricut® for a few years now and I love it. The possibilities are endless, but certainly what I use mine for the most is cutting out letters. I use them for gift tags, school projects, notecards, home decorations... there are so many options. 

One of my favorite things to do with the letters is create party banners. If you don’t have a personal die cutting machine, most local scrapbooking stores have die cut press machines that you can use for a small fee.  Another alternative is to print out large letters in a font that you like, then use the printed letters as a stencil... but obviously that is much more time consuming!

This is a party banner I made for our church’s Spring Boutique this year:


{I got the darling poms here.}

Step One:
Cut out all the letters of your phrase in a solid paper for the shadow. I used black paper.
If you don’t have a die cutting machine, skip the shadow.

Step Two:
Cut out the letters of your phrase in the coordinating patterned paper(s).
{I have used up to three different coordinating papers, but because I am a bit OCD I make sure every third letter is the same paper.}
Glue them to the shadows, if you have shadows.

Step Three:
Cut a rectangle for each letter in a coordinating solid paper.
Be sure that the letters will pop off of whatever color you choose.   
Since I used black for the shadows, I used white here.
Punch two holes at the top of each sheet, about an inch from the top and an inch from either edge.

Step Four:
Glue the letters to the rectangles.

Step Five:
Slip them onto your ribbon (I used black tulle) in the correct order.

Step Six:
Hang your banner!

Monday, April 26, 2010

Luggage Tags

Last month I organized a Spring Boutique for my church, and I decided it would be fun to have a Make-and-Take project at my booth. Since I sell calendars, I figured something calendar-related would be appropriate.  So I created these Calendar Tags:


A couple of days after the boutique my friend Sarah came over to my office to play.  Long story short... she needed a gift for her mom, and they were leaving for a girls' trip to New York in a few days.  We tweaked the Calendar Tags a bit, and viola... Luggage Tags!  


Here's how you can make one of your own.

You will need:
Coordinating paper
Chipboard tag (I used Kaiser Kraft's Beyond the Page Bag Tags, which come in a set of 5)
Ribbon
Glue
Ink pad
X-acto knife
File

I also used my Cricut machine, and some Shimmer Spritz for sparkle, but if you don't have those items you can do without.
First, cover one entire side of the tag with glue.  Make sure to get it really well around the edges, including around the hole.


Cover that side with one of your decorative papers and smooth is down to ensure it is stuck very well.


Now you will need to cut around the edge of the tag with an X-acto knife.  


Be sure to also cut around the hole.
Don't worry if your edge is not perfect because after cutting, you will file around the entire edge.  This ensures that the paper is flush with the edges, and gives it a bit of a distressed look.


Now do the same thing to the other side of the tag, using a coordinating paper.


Using an ink pad (I like to use Stayz On ink because it dries quickly and won't get all over everything), color all around the edges.  


If you would like a more distressed look, you can rub a little around the edges of the paper as well.

Then be sure to dab the edges with some tissue to get off any excess ink and avoid a huge mess.


Next I used my Cricut machine to cut out a shadowed initial for the front of my tag.  

 
If you don't have a die cutting machine, you can print a letter out from your computer, use rubber cement to lightly glue it to your decorative paper, then cut it out and remove the stencil. 

Glue your letter onto one side of your tag.


I created a simple address label on my computer, then mounted it on some coordinating solid paper...


and glued it onto the other side of the tag.


Cut some ribbon (I used toule) to tie through the whole for decoration.  


This is where I added the sparkle!  If you have some sort of glitter spray (I used Shimmer Spritz, which I am kind of obsessed with right now), spray the letter side of the tag.
Cut a long piece of ribbon (about a yard, so that you have plenty of space to tie it onto your luggage), fold it in half, and slip the loop through the hole in the tag, from the letter side.


Slip the other end of the ribbon through the loop.


Then pull it tightly all the way through.


Look how cute!


Finally, I added a fun little quote to the letter side of the tag.  It says, "High Maintenance doesn't even begin to describe it!"


And that's it!


All in all I would say that this craft takes about 15 minutes to complete, not counting the time it will take you to create the printed elements.  If you would like a pdf of the file that I used, leave a comment with your email address and I will gladly send it to you!